Saturday, March 16, 2013

In search of the perfect egg...

 My husband is from a very large family, and our holidays are always potluck. I have spent years trying to find a niche to fill, something that I can make at home, bring to the party, and everyone will enjoy. Enter the perfect appetizer: the deviled egg. Making deviled eggs has become a bit of an obsession for me. When you are making 36 of them at a time, you are always looking for ways to streamline the process. One of the biggest time investments for this project is the peeling. I need to be able to peel the eggs quickly and still have the white part look smooth and pretty.

Everyone has a tip for making the "perfect" hard-boiled egg. Do an internet search--it's overwhelming. Unfortunately, my eggs are often hit or miss. They always taste great (do to my "secret" ingredients), but sometimes they look like I tried to shoot the shell off with birdshot. (For the record, I've never tried it...maybe it works!) Therefore, I have decided to approach the problem scientifically. (I may have spent too many semesters working in the physics lab.)

First, identify the problem. I want eggs that are easy to peel.

State a hypothesis. I think that there is something to the old wisdom that older eggs are easier to peel. There is plenty of anecdotal evidence to support the theory.

Create an experiment. I chose to try two cooking methods: baking and boiling. I also wanted to know if the eggs peeled easier immediately after they are cooked, or if they peel easier after having chilled in the fridge overnight. I used four eggs for each method: two older eggs purchased a week ago, and two newer eggs purchased yesterday. One of each was peeled while still slightly warm, and the other was chilled in the fridge overnight. I also included two new eggs cooked in a separate pan with baking soda in the water, which was rumored to help make fresh eggs peel better. I made a chart and numbered each egg with a Sharpie.

 
For the boiling method, I chose to follow the wisdom of my Better Homes and Gardens cookbook. (The big red and white checkered one that belongs in every kitchen.) My theory is that the method has been thoroughly tested by millions of cooks over the years. Place cold eggs in a pan and cover with cold water. Bring to a boil, cover and remove from heat, and allow to sit for 15 minutes.
 

For the baking method, I used a tip I found on Pinterest. Place the eggs in a muffin tin, bake at 325 for 25-30 minutes. It is interesting to note that the fresh eggs exuded some kind of moisture through the shell during the baking process, which then browned. The old eggs did not. (Both the old and new are the same brand, from the same local farm.)


 After cooking, I ran all the eggs under cold water for several minutes. I dried half of them and put them in the fridge. I peeled the other half, which were still slightly warm. Observations: as suspected, the older boiled egg peeled perfectly, while the newer boiled egg was hard to peel. The egg boiled in baking soda was a complete failure, and I ended up throwing it away! Both the older and newer baked egg peeled beautifully! However, the baked eggs had scorch marks where the shell was in direct contact with the metal pan. I had to cut those parts out anyway, which sort of negated the ease of peeling. (Once peeled, I put the eggs in a ziptop bag with a little water and put them in the fridge.)

The next day I peeled the other half of the eggs. The boiled eggs all had peeling issues, but the older egg looked the best. The egg boiled in baking soda practically fell apart during the peeling process, and was unusable for deviled eggs. The baked eggs fared a little better, but the shell stuck to the scorched parts. (You can see the scorch marks on egg #4 below, lower center.)

 
My peeling method includes rolling the egg along the counter, and peeling under running water. This method was used for all the eggs. I had additional requests to test for the "greying" of the yolk. Greying doesn't bother me, because the only time I make hard-boiled eggs is for deviled eggs, so you don't really see the greying. But, I did notice a weak correlation between eggs that were easier to peel and greying yolks. In the picture below, both yolks were baked. The one on the left was from an older egg, the one on the right from a fresher egg. The boiled eggs also showed more greying in the older eggs than the newer.


Conclusion: I accept the hypothesis that older eggs are easier to peel. Baking the eggs did make them easier to peel, but left scorch marks that I was not happy with. (I wonder if using a silicone muffin pan would make a difference? Or possibly rotating the eggs during cooking time?) Fresher eggs had less greying of the yolk, so it almost seems like you have to chose between a pretty white or a pretty yolk! It is also worth noting that across the board the eggs were easier to peel while they were still slightly warm...cold eggs stuck to the shell much more than warm ones. (Baking soda in the water was completely useless, and possibly sabotaged the process!)

Remember, every egg is different, and it is impossible to make exact comparisons. But, I think it is safe to say that boiling older eggs and peeling them right away is the way to go.

And now, I will share my "secret" deviled egg tips!

Tip #1: Zip top bag. As you slice the eggs and remove the yolks, place them directly into a ziptop bag. Close the bag and smash just the yolks until smooth and they start to clump together.

Tip #2: Miracle Whip and Dijon Mustard. Yes, most people use mayonnaise, and that is where they go wrong. Also, yellow mustard is so overdone. Try using miracle whip and dijon mustard...you will never go back. You can also try different flavors! One of my favorites is pesto with miracle whip. I have also used salsa and cream cheese, and it was awesome!

 
Add the ingredients directly to the bag with the smashed yolks. Seal it up and mash it all together until smooth. No mixing bowls!

Tip #3: Salt the whites. Be sure to sprinkle salt over the whites before you add the filling.
 
Tip #4: Pipe the filling. Snip a corner off the bag and pipe the filling into the egg whites. It is so much prettier than trying to spoon it in. The filling below contains a few drops of food coloring. (These were made for St. Patrick's Day, so they are orange and green, mustard and pesto. They also look a little shaggy because some of them were fresh eggs...)


Enjoy! Let me know if you have additional techniques or tips to try!


Tuesday, August 14, 2012

Movie Sets

Darling daughter envisions herself as a budding film director. Apparently, there are a number of young ladies that create YouTube videos using their dolls. Basically, it's the same pretend play we did growing up, but now there is camera involved. I have watched quite a few of these, and some of them are quite good! (Somebody's Daddy can afford some pretty good video and editing equipment!) Some of them are...well, I don't see a Tubey award anytime soon. I would have to objectively say that my daughter falls somewhere in between. I have been trying to work with her to get her to think about lighting and background, and clean up her plot development. (It's almost as though 10 year olds don't understand the importance of these film elements.) Therefore, we decided to create some backdrops and furniture that she can use in her movies. (It's a creative endeavor, after all, not vegging in front of the TV all summer.)


A stop at Michaels (and JoAnn's, AND Hobby Lobby!) gave us some starting supplies. We found a bunch of cute wooden craft items we could paint, and bought a bunch of different scrapbook papers for backgrounds and accessories. (Did you know they make corkboard and chalkboard scrapbook paper??) My daughter uses Monster High dolls in her videos, so she chose a lot of gray and black and pink, as well as wood and brink and grass for variety. (Monster High is where the teenage children of traditional monsters, like vampires, werewolves, mummies, zombies, swamp things, etc., go to school. They're actually pretty cool, if you wanted my thoughts about it!)


We used foam poster board for the base, and added the craft paper using matte Mod Podge. I used a box cutter to cut the foam board, and did a terrible job. Tip: make sure you are using a new razor blade, and a straight edge. Duh.

We pasted scenes on both sides of the board, so they can be interchangeable. For example, she can use the brick background as a wall, or as a floor. Other backgrounds got more details added, like windows, chalk boards, etc. We glued on wooden craft sticks as trim to give these details a little more dimension.

Here is the coffee shop scene, The Coffin Bean. I know it's not a typical "hangout" a 10-year-old would understand, but we watch a lot of Friends on DVD, so my daughter understands the connection.


 The display shelves are actually the back of a wooden chest of drawers. I printed the picture off the Internet and glued in craft sticks as shelves. The specials board is sitting on a real mini-easel we found at the craft store, as well as the mini coffee cups. (Score!) The end table is one of the drawers from back of the shelf, and so is the espresso machine! I just glued some metallic-looking craft paper around three sides. When it is in the chest, you can't tell it apart from the other drawers. The couches are craft plaques, and are "upholstered" with velvety scrapbook paper then hot glued together.

Another background we finished is the outside of the Monster High School, although it could be used for any castle.


Admittedly, not my best work, but DD was pleased and I suppose that was the point! This door is all one piece, and something we purchased at one of the craft stores. Not sure what the purpose of it is (there is a wall hanger on the back?) but it suited our needs just fine. The windows are glued down, but the door (and wall/step) are just sitting there and can be removed or moved to the side as needed. By the way, those paper wrinkles were purchased like that, and were not a result of the Mod Podge process! (There were plenty of other wrinkles, so I wouldn't want to be blamed for these!) We thought they kind of looked like rock or stucco or whatever it is castles are made of!

In case you are wondering what a Monster High doll film looks like, you can see one here (It's only a couple minutes long):


This is my daughter's work. She might have a way to go, but this one is actually better than some of her first efforts, so I'm trying to be supportive!

I'm hoping this project helps teach her the power of glue and paint, and looking at things in new ways! (And maybe a better developed plotline!!)

Saturday, August 11, 2012

Halloween...in August

Hello everyone! You might be wondering where I have been (or not) but I can assure you that I have been very busy! Recently I have had the opportunity to engage in more crafts, which reminded me I was a little behind on this blog! So, first things first...I will show you last year's Halloween costumes, made (almost) from scratch.

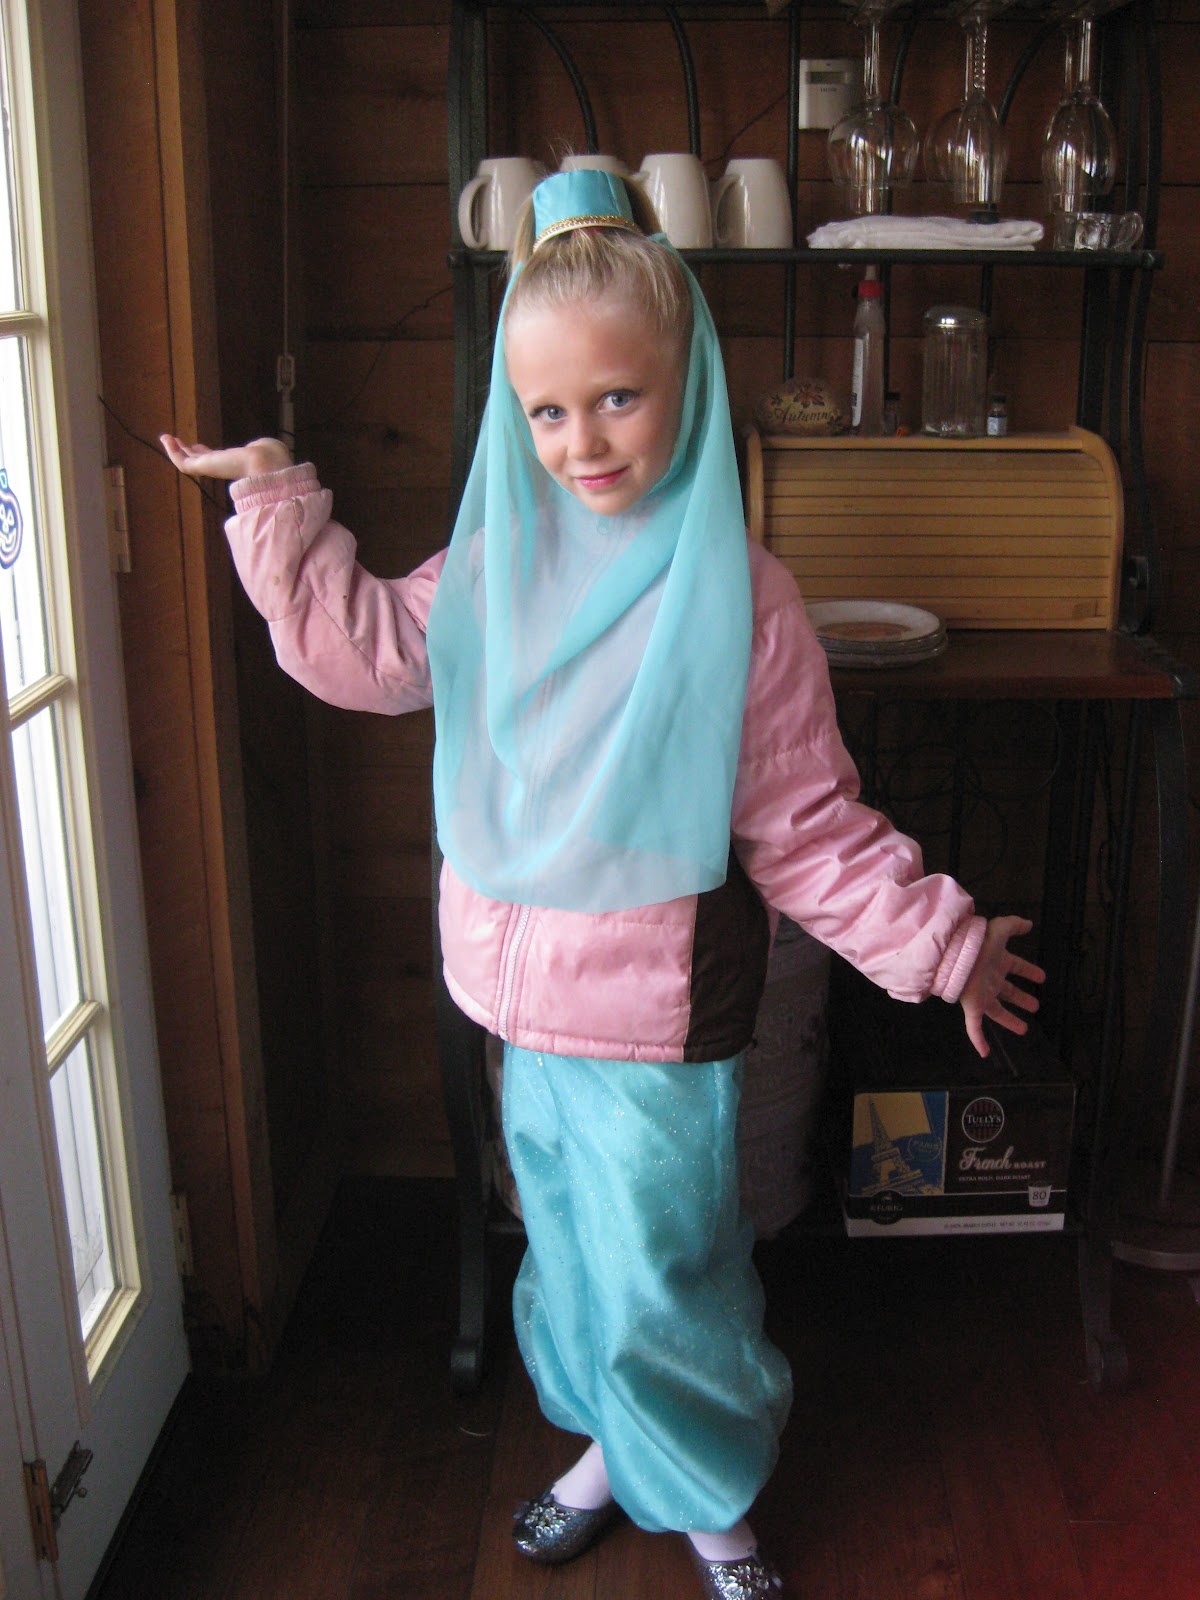
First, my darling daughter wanted to be a genie. Why is it that little girls have no concept of  40 degree weather? (below 30 with the wind chill) So, I tried my best to create a genie costume that could of course be worn over a heavy jacket or winter coat. The pants worked perfectly, and she was able to wear them with a pair of tights and another pair of leggings for warmth. The top...well, lets just say it didn't turn out! However, with the hat/veil and pants, it was clear to everyone that she was supposed to be a genie, so I'm calling it a win.


I regret that neither you nor the trick or treat patrons were able to see the great detail of the "coin" embellishments around the yoke of her pants, nor the sparkly overlay and shimmery lining...it was some of my best work, and yet managed to escape the camera. Such is life.

Next is my little monkey man. I "cheated" a little with his costume by altering some clothing I bought.


I bought the tail, which was my biggest concern, and some brown sweatpants, sweatshirt, pilot-style cap and stretchy gloves. I used an applique technique to add a "leathery" fabric over the logo of the shirt to look like a monkey tummy, as well as an inner ear, which was added to the cap.


He looks a little "puffy" since he is wearing another sweatshirt underneath for warmth! The hat is another story...

Anyone can dress their toddler as a monkey and it is going to be cute. I always have to take it one step further, so I wanted him to be an organ grinder monkey. (Thus the little hat.) Of course, this means I would dress as the organ grinder, which unfortunately was something I was throwing together last minute, and therefore does not reflect my full abilities, as far as I am concerned! The "organ" was made from a cardboard box covered in wrapping paper, and embellished with a little gold braid left over from the kids' costumes. I am holding it up with shoestrings. The "pipes" are made from the wrapping paper tube, cut into lengths then cut in half and painted gold. Inside the box is a jack-in-the-box with the crank sticking out, so I can turn the crank to create real music (My hand is covering it). The open part of the box contains my wallet and camera and a container for Monkey's candy.

In case you are wondering what that contraption is that Monkey and I are wearing, it is called a Piggyback Rider, and it is an MUST OWN product for toddlers that have outgrown a Kelty-style backpack. Not only could I not imagine trick or treating with this crazy, active little guy, I cannot fathom visiting the zoo or taking a plane ride without one!

So there is our hand-crafted Halloween, 2011! Sorry you had to wait so long to see it!

Tuesday, August 2, 2011

Hooded Towel

Oh, baby! When you get to be a certain age (really late 20s...okay, okay mid-30s), you find yourself invited to a lot of baby showers. Pretty close to half the people I know either just had a baby or are expecting one soon. I suppose I should have seen this coming when I was attending a wedding every weekend a few years ago, but here we are. Sure, I could hit the baby section and stock up on items, but I've always been an over achiever!


In a previous post I showed hand-knit baby booties, but I am finding that those are really only good for brand new infants. If baby is a little older, he/she needs something a little different. Enter the hooded towel.


My mother used to make these for baby showers when she was in her really late 20s and all her friends and family were having babies. Her design was a little different, but I like to put my own spin on things. This one is for a dear childhood friend who just had her first baby. I use a full size bath towel so she can use past babyhood. The hood part I make from a hand towel, and the petals are cut from a hand towel as well. It is modeled here by my darling daughter who is 9, so you can see how big it is. DD still uses her own hooded towel to this day!


Since the hood only uses part of the hand towel, I used the rest to make a little wash mitt. The stripes are knit jersey cut from an old T-shirt and tacked down with a zig zag stitch and are only on the back. The wings are microfleece.


I also made a similar towel for a baby boy from a brown towel and added little bear ears to the hood. I made the mitt look like a bear claw, which turned out so cute! Unfortunately, I was still stitching it together about 5 minutes before the shower so I didn't get a picture of it.


You would think that with all these babies coming I would learn my lesson and just have some towels done and boxed up, but I work better under pressure! Besides, who knows what will inspire me next!

Friday, July 1, 2011

Golf Stroke Counters

Anyone who has played golf with me knows that words like "birdie" and "par" rarely apply to my score card. For those of us who need more than a handful of hits, stroke counters are handy little tools. I've tried the clicker style counters, but they are for counting a whole game, and are very difficult to reset for every hole, which is the way I like to score. I've even tried a digital counter, but one surprise rainstorm put an end to that!

Last summer at my local ladies golf league, I won a pin-prize that included a beaded stroke counter. It was genius! I can hook it with a half-hitch to my belt loop, and slide the little beads one at a time to help me keep track of my strokes. As with most little craft items, I took one look at it and thought, "I can make that."

This summer I did. I made a second one for myself, and also made one for my mom and all my ladies league team members!


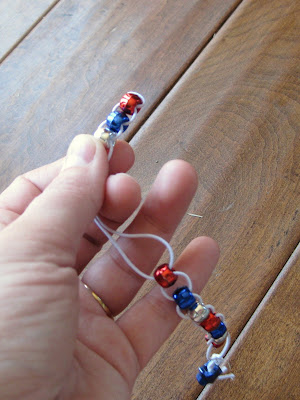
I bought a big package of red, white, and blue beads and some elastic cord. The beads are strung "X" style, so they can slide easily but stay securely where you put them.


Each counter has ten counting beads and one handle bead to help with the hooking and unhooking. (When you run out of beads, you know to pick up your ball and move on!) It's a simple little solution, and I wish I could claim it as my own, but I did "borrow" the design. Just another little craft thing that keeps my hands busy. Anything to distract me from doing the dishes! Enjoy your summer!

Thursday, June 2, 2011

Sharp Dressed Doll

Yes, it's been awhile since my last post. But, during that time I have managed to work on a few projects, namely some doll clothes for my darling daughter. Okay, you got me...they were a Christmas present, but I think it still counts if the project was less than a year ago!

Santa was bringing a new American Girl Doll for her, and since that pretty much strapped "his" budget, Mom thought she would supplement with some new clothes. Luckily there are a bunch of patterns available for this sized doll, and they worked perfectly! The following picture is an outfit that I made for one of my daughter's friend's birthday.


I used fabric from some of DD's clothes that she had outgrown, which made for a cute T-shirt and denim capri set. Paired with a pair of doll "crocs" in hot pink that I found at Michaels, and it turned out to be a fun birthday present.


The rear view needed a little work, but this pic was taken before I ironed the shirt. The back pockets were a fun addition, but I think they were a little small. The corduroy jeans I made for my daughter's doll had bigger pockets, and it looked a little better.


I made two pairs of pajamas, brown cords, a fleece lined ski jacket with fleece hat, a quilted jacket with hood, a hand knit sweater and scarf, and some fuzzy slippers. (Whew!) Needless to say, I was still scrambling to finish them the day before Christmas, so when they were done they got wrapped before I could take a picture. Maybe soon I will pose the dolls for a photo shoot when I have nothing but time! (Don't hold your breath!)


All of the clothes were made from "found" material, such as old clothes from my daughter or Goodwill, or some of the scraps of fleece I had in my fabric box. I was also able to use up some of my yarn scraps, so whenever I find myself with a bunch of "scrap" material, I'll know it might be time for more doll clothes! ;)


Monday, August 2, 2010

7 Days to an Organized Home

First, let me begin by saying that I am a fan of organization. Unfortunately, I have difficulty applying it to my home. I have great ideas, and I love reading magazines and articles on how to organize a home, but they just aren't working for my family.

Have you ever seen those lovely pictures of a perfectly organized closet, and thought to yourself, "I wish my closet could look like that." Then you realize that there are only seven shirts and 4 pairs of shoes. Well, that would never work for me! I need something that can organize dozens of shirts and at least 10 pairs of shoes. I need something for real people.

Since I can't find my guru externally, I have decided to become my own. I will devise an organizational system based on the many parts of other systems that I liked but just couldn't make work. This will be my franken-system. I'll write a blog for each day, stating my goals and then tell you how well (or even if) those goals were met.

I'm going to do it in 7 days. Why? No good reason, it just seemed appropriate. The best part will be that I don't have to commit to 7 days in a row, either! I will do one day at a time, and if it takes me a week to get to day two, well, I'm not hurting anyone but myself! And so...on with the show!

Wednesday, July 14, 2010

Baby Quilt


So, I'm a little behind. I've been busy with projects, just not of my own choice! We've been moving and working on the addition to our house. Plus, it's summertime, and there just isn't enough time for all the crafts I'd like to do!
My sister's baby girl was born in December, and the good auntie that I am, I still hadn't given her a baby gift! My sister and her family were coming to visit (they live far, far away) so I really had to bust it to get the quilt finished for my sweet little niece!
I am not much of a "quilter", so my quilts are rather childish and simple. And for heaven's sake, don't look too closely at the stitching! But I think this one turned out pretty cute.
My sister and her hubby are big mountain fans, so this pattern is supposed to resemble the mountain range I see out my kitchen window, in a cartoonish sort of way.


I now know exactly why the lady at the fabric store suggested a "walking foot" for working with the minky fabric (the purple stuff). It does NOT slide very well, which tends to bunch up the the other fabrics.


My sister LOVES statin blanket binding, so obviously I would include it. (She will sit and run it through her fingers for hours without even knowing she's doing it! We gave her a lot of grief about it when we were kids!) But I choose this super cute, rainbow colored thread to bind with. Not a great idea. This stuff is like tinsel, and it would break every couple inches. I was very frustrated with it, but managed to finish the project without throwing the sewing machine against the wall. (It was a close call a couple times, until my husband reminded me how much "fun" I was having. I hate it when he's all rational. It puts a damper on my tantrum.)


Anyway, better late than never! Welcome to the world, Baby Natalie!

Thursday, February 18, 2010

Kitchen Painting

The kitchen re-do is amost done! (I've only got a couple more coats of clear coat on the countertops, but for all intents and purposes, it's done.) Here is a before:


Take note of the wonderful mismatched cabinets and lovely 1975 yellow laminate countertop. Now, with a little paint, and some sweat equity, here is our new kitchen:


The blue tape is not part of the color pallate. It'll come off when all the clear coating is done!

The cabinets were all painted white, and the wall was painted a tan/taupe color.


The countertops are painted. (Yes, painted.) I sanded the countertops, just to take off the shine, then put on a coat of primer. The first coat of paint was a tan, with cream and charcoal grey sponged on. (We used a plastic grocery sack to sponge it one...worked great, and didn't absorb all the paint!)


There just isn't much I could do about the cracking edge. Oh well, it still looks better than it did before!


Finally, I put on a coat of polyurethane (clear coat) to seal the paint. It needs about two more coats before I can really use it. They say you can scrub it and everything, but I think we'll be a little ginger with it...at least until the "real" remodel, hopefully sometime next year.

All in all, it doesn't look two bad for under $200!


Wednesday, January 27, 2010

Baby Booties

I live in sheep country. There is a Wool Growers Association here. My father-in-law, and his father before him, raised sheep in these hills. Our high school mascot is The Sheepherders. (You can't even make that up!)


I tried for years to come up with a project, a craft of some sort that I could make for all of my girlfriends and relatives who were expecting babies. (And I have a LOT of friends, and even MORE relatives!) I found the answer in the traditional baby booties.


It's perfect. It's simple. It's quick, which is particularly important when you get the informal, "By the way, we're gonna have a baby shower for so-and-so this Saturday. Can you come?" (Usually comes on a Thursday.)


The pattern is based loosely on a pair of woolen baby booties my aunt brought home from Ireland for my infant daughter. The pattern is tradition and unusual in these modern times, which makes it stand out at baby showers. Paired with a pattern I was already using I was able to make it my own. The upper portion is knit in one piece, then stitched down the back. The sole is a piece of fleece, leather on one side with fluffy wool on the other, which makes them non-skid and still super cozy on baby's feet! A ribbon through the eyelet row helps keep them on little kicky feet.


And, the most important part, I make them with Sweet Grass Yarn, the wool grown locally and processed in a way that allows the natural lanolin to remain in the yarn. And of course I package them in a custom, hand-painted box featuring (what else?) fluffy sheep.


It's a very personal gift that I am quite proud of. Hopefully I will continue to be able to use local wool and support my local sheep ranchers!

Sunday, January 17, 2010

Blue Skies are Gonna Clear Up ♪

I painted a room! I know, you're thinking, "big whoop." But I have never done it before, so it is an exciting time for me! I've never really had walls that belonged to me before, so I can't wait to start on all the other rooms!

I started with my daughter's room. It is the smallest, and it actually had drywall to paint. (All the other rooms have paneling) I painted three of the walls white, leaving the wall that is wallpapered alone. (I think it's ugly, but my daughter doesn't mind the cutesy cartoon mice with pink and purple balloons, so whatever...)

But the big fun was in her closet. It's a nice sized walk in, and because she has about 5 items of clothing than need to hang, we've made the closet into a playroom of sorts, where she can set up her Barbies and Littlest Pet Shops in peace. So following this theme, I painted the closet a sky blue and sponged on fluffy clouds.

I think my first attempt at painting was fairly successful, and I can't wait to get my roller on all that ugly paneling...


Tuesday, January 5, 2010

Holiday Pause

Every year I think about all the cute, crafty things I can do for the holidays. And then I remember what they are actually like and give up. During the holiday season, Mom is luck if she gets to sleep a few hours a night, much less trying to get any crafting done. I always have grandiose ideas, but there just isn't the time.

Hopefully the crafting will pick up again now that they are over. Here's hoping!

Coming Soon:

  • Still working on those socks

  • Still working on those baby things. (Although they might be outgrown by then!)

  • Have got a major painting project in the works...still in the planning phase

Sunday, November 1, 2009

Little Stinker

I've been so busy this last week, sewing up a storm! It's easy to tell when it's Halloween around here because my sewing machine takes up permanent residence on the kitchen table. This year, in addition to my daughter's mermaid costume, I made a skunk costume for my son for his first Halloween. I also made a 20s flapper costume for myself. (I was still working on it Saturday afternoon!) Here is my little skunk:


I made his tail detachable (Velcro) so he would still be able to sit in his carseat or stroller. It turned out pretty cute!

Coming Soon:

  • Hand-knit socks
  • Christmas ornaments
  • Baby gifts for friends

Tuesday, October 13, 2009

My Little Mermaid

My daughter found a beautiful mermaid costume in a catalog recently. (Why do I even bring those home?) Of course, those mass produced costumes cost around $50, and they are usually ill fitting and cheaply made. (The southern belle gown from last year was in tatters before the trick or treating was over.) I figured for $50 I could come up with something similar, that would hopefully fit my petite little gal better. So she and I headed to the fabric store, where we found the cutest fabric that looked like slinky scales! I of course totally over estimated how much I would need, but considering I was working without a pattern, I think it turned out pretty good.

I don't make clothing very often, so it took a lot of planning. (How will she get it on? Can she use the bathroom? Can she walk? Can she wear sweatpants underneath?) The pink bikini top is completely adjustable (hook and loop tape) so she can wear it over her pink leotard for school and still wear it over her pink coat for trick or treating in our frigid, northern climate. We added the green boa because DD thought it looked like seaweed...

Coming soon:
  • Baby brother's skunk costume
  • Almost got one sock done...
  • Sorting through my ridiculous yarn stash for the proper baby bootie yarn

Monday, October 12, 2009

Mommy bracelets


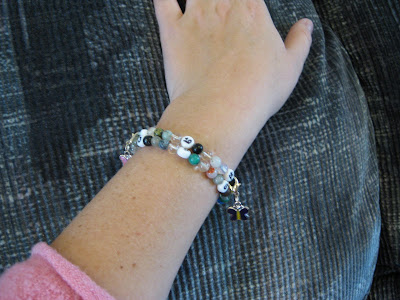
As a new mommy, I totally understand the "mommy brain" phenomenon. The one where you can barely remember your own name, much less what time it was when the baby ate last! I saw some nursing bracelets for sale, and the design was so simple that I wanted to try to make my own. Mine are of course a little different, but I think they turned out pretty cute!


These are made with beads on memory wire so they are simple for nursing mommies to move from one arm to the other to help track where baby fed last. There are numbered beads and little charms to keep track of baby's feeding times and number of diaper changes. Plus, the modern beads are pretty cute! I used mine so much the numbers are wearing off the beads, but these two are destined for some mommy-to-be friends of mine.


Coming soon: (Also known as: the stuff I've started but haven't finished yet!)
  • My kids' Halloween costumes (a mermaid and a skunk)
  • A pair of socks I'm knitting with some fabulous soy yarn
  • Baby booties (for those new babies mentioned above!)
  • Cloth diapers

Sunday, October 11, 2009

Welcome!

Have you ever been standing in a craft store, surrounded by all the beautiful yarn options, and had a full-on delusion about how often you actually knit? Have you ever said to yourself, "Self, I think I'm going to make all of my Christmas presents by hand next year." Or stood in a bead store and wondered why you don't just make jewelry as a profession? How's that novel coming along? Or that quilt? Or the obsession with making the perfect French pastry?

Welcome to my world, where all of my best intentions need a little push to come to fruition. The rule here is, I will share my crafting projects, but only when they are actually finished. Hopefully this might give me the push to finish more of them! As a creative person, I am more interested in the planning and dreaming phase, and unfortunately I only rarely ever see the final result.

Feel free to comment. (And not because I'm an ego-maniac who constantly needs to know that people love her...though that's hard to deny...)

Enjoy! I would be pleased of offer any patterns that are not proprietary, if there is any interest. Happy crafting!