Tuesday, August 2, 2011

Hooded Towel

Oh, baby! When you get to be a certain age (really late 20s...okay, okay mid-30s), you find yourself invited to a lot of baby showers. Pretty close to half the people I know either just had a baby or are expecting one soon. I suppose I should have seen this coming when I was attending a wedding every weekend a few years ago, but here we are. Sure, I could hit the baby section and stock up on items, but I've always been an over achiever!


In a previous post I showed hand-knit baby booties, but I am finding that those are really only good for brand new infants. If baby is a little older, he/she needs something a little different. Enter the hooded towel.


My mother used to make these for baby showers when she was in her really late 20s and all her friends and family were having babies. Her design was a little different, but I like to put my own spin on things. This one is for a dear childhood friend who just had her first baby. I use a full size bath towel so she can use past babyhood. The hood part I make from a hand towel, and the petals are cut from a hand towel as well. It is modeled here by my darling daughter who is 9, so you can see how big it is. DD still uses her own hooded towel to this day!


Since the hood only uses part of the hand towel, I used the rest to make a little wash mitt. The stripes are knit jersey cut from an old T-shirt and tacked down with a zig zag stitch and are only on the back. The wings are microfleece.


I also made a similar towel for a baby boy from a brown towel and added little bear ears to the hood. I made the mitt look like a bear claw, which turned out so cute! Unfortunately, I was still stitching it together about 5 minutes before the shower so I didn't get a picture of it.


You would think that with all these babies coming I would learn my lesson and just have some towels done and boxed up, but I work better under pressure! Besides, who knows what will inspire me next!

Friday, July 1, 2011

Golf Stroke Counters

Anyone who has played golf with me knows that words like "birdie" and "par" rarely apply to my score card. For those of us who need more than a handful of hits, stroke counters are handy little tools. I've tried the clicker style counters, but they are for counting a whole game, and are very difficult to reset for every hole, which is the way I like to score. I've even tried a digital counter, but one surprise rainstorm put an end to that!

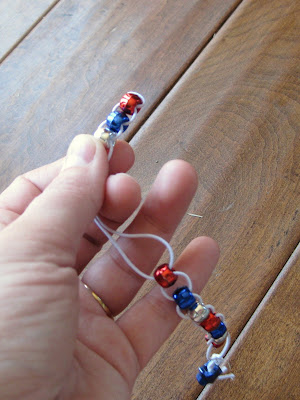
Last summer at my local ladies golf league, I won a pin-prize that included a beaded stroke counter. It was genius! I can hook it with a half-hitch to my belt loop, and slide the little beads one at a time to help me keep track of my strokes. As with most little craft items, I took one look at it and thought, "I can make that."

This summer I did. I made a second one for myself, and also made one for my mom and all my ladies league team members!


I bought a big package of red, white, and blue beads and some elastic cord. The beads are strung "X" style, so they can slide easily but stay securely where you put them.


Each counter has ten counting beads and one handle bead to help with the hooking and unhooking. (When you run out of beads, you know to pick up your ball and move on!) It's a simple little solution, and I wish I could claim it as my own, but I did "borrow" the design. Just another little craft thing that keeps my hands busy. Anything to distract me from doing the dishes! Enjoy your summer!

Thursday, June 2, 2011

Sharp Dressed Doll

Yes, it's been awhile since my last post. But, during that time I have managed to work on a few projects, namely some doll clothes for my darling daughter. Okay, you got me...they were a Christmas present, but I think it still counts if the project was less than a year ago!

Santa was bringing a new American Girl Doll for her, and since that pretty much strapped "his" budget, Mom thought she would supplement with some new clothes. Luckily there are a bunch of patterns available for this sized doll, and they worked perfectly! The following picture is an outfit that I made for one of my daughter's friend's birthday.


I used fabric from some of DD's clothes that she had outgrown, which made for a cute T-shirt and denim capri set. Paired with a pair of doll "crocs" in hot pink that I found at Michaels, and it turned out to be a fun birthday present.


The rear view needed a little work, but this pic was taken before I ironed the shirt. The back pockets were a fun addition, but I think they were a little small. The corduroy jeans I made for my daughter's doll had bigger pockets, and it looked a little better.


I made two pairs of pajamas, brown cords, a fleece lined ski jacket with fleece hat, a quilted jacket with hood, a hand knit sweater and scarf, and some fuzzy slippers. (Whew!) Needless to say, I was still scrambling to finish them the day before Christmas, so when they were done they got wrapped before I could take a picture. Maybe soon I will pose the dolls for a photo shoot when I have nothing but time! (Don't hold your breath!)


All of the clothes were made from "found" material, such as old clothes from my daughter or Goodwill, or some of the scraps of fleece I had in my fabric box. I was also able to use up some of my yarn scraps, so whenever I find myself with a bunch of "scrap" material, I'll know it might be time for more doll clothes! ;)


Monday, August 2, 2010

7 Days to an Organized Home

First, let me begin by saying that I am a fan of organization. Unfortunately, I have difficulty applying it to my home. I have great ideas, and I love reading magazines and articles on how to organize a home, but they just aren't working for my family.

Have you ever seen those lovely pictures of a perfectly organized closet, and thought to yourself, "I wish my closet could look like that." Then you realize that there are only seven shirts and 4 pairs of shoes. Well, that would never work for me! I need something that can organize dozens of shirts and at least 10 pairs of shoes. I need something for real people.

Since I can't find my guru externally, I have decided to become my own. I will devise an organizational system based on the many parts of other systems that I liked but just couldn't make work. This will be my franken-system. I'll write a blog for each day, stating my goals and then tell you how well (or even if) those goals were met.

I'm going to do it in 7 days. Why? No good reason, it just seemed appropriate. The best part will be that I don't have to commit to 7 days in a row, either! I will do one day at a time, and if it takes me a week to get to day two, well, I'm not hurting anyone but myself! And so...on with the show!

Wednesday, July 14, 2010

Baby Quilt


So, I'm a little behind. I've been busy with projects, just not of my own choice! We've been moving and working on the addition to our house. Plus, it's summertime, and there just isn't enough time for all the crafts I'd like to do!
My sister's baby girl was born in December, and the good auntie that I am, I still hadn't given her a baby gift! My sister and her family were coming to visit (they live far, far away) so I really had to bust it to get the quilt finished for my sweet little niece!
I am not much of a "quilter", so my quilts are rather childish and simple. And for heaven's sake, don't look too closely at the stitching! But I think this one turned out pretty cute.
My sister and her hubby are big mountain fans, so this pattern is supposed to resemble the mountain range I see out my kitchen window, in a cartoonish sort of way.


I now know exactly why the lady at the fabric store suggested a "walking foot" for working with the minky fabric (the purple stuff). It does NOT slide very well, which tends to bunch up the the other fabrics.


My sister LOVES statin blanket binding, so obviously I would include it. (She will sit and run it through her fingers for hours without even knowing she's doing it! We gave her a lot of grief about it when we were kids!) But I choose this super cute, rainbow colored thread to bind with. Not a great idea. This stuff is like tinsel, and it would break every couple inches. I was very frustrated with it, but managed to finish the project without throwing the sewing machine against the wall. (It was a close call a couple times, until my husband reminded me how much "fun" I was having. I hate it when he's all rational. It puts a damper on my tantrum.)


Anyway, better late than never! Welcome to the world, Baby Natalie!

Thursday, February 18, 2010

Kitchen Painting

The kitchen re-do is amost done! (I've only got a couple more coats of clear coat on the countertops, but for all intents and purposes, it's done.) Here is a before:


Take note of the wonderful mismatched cabinets and lovely 1975 yellow laminate countertop. Now, with a little paint, and some sweat equity, here is our new kitchen:


The blue tape is not part of the color pallate. It'll come off when all the clear coating is done!

The cabinets were all painted white, and the wall was painted a tan/taupe color.


The countertops are painted. (Yes, painted.) I sanded the countertops, just to take off the shine, then put on a coat of primer. The first coat of paint was a tan, with cream and charcoal grey sponged on. (We used a plastic grocery sack to sponge it one...worked great, and didn't absorb all the paint!)


There just isn't much I could do about the cracking edge. Oh well, it still looks better than it did before!


Finally, I put on a coat of polyurethane (clear coat) to seal the paint. It needs about two more coats before I can really use it. They say you can scrub it and everything, but I think we'll be a little ginger with it...at least until the "real" remodel, hopefully sometime next year.

All in all, it doesn't look two bad for under $200!


Wednesday, January 27, 2010

Baby Booties

I live in sheep country. There is a Wool Growers Association here. My father-in-law, and his father before him, raised sheep in these hills. Our high school mascot is The Sheepherders. (You can't even make that up!)


I tried for years to come up with a project, a craft of some sort that I could make for all of my girlfriends and relatives who were expecting babies. (And I have a LOT of friends, and even MORE relatives!) I found the answer in the traditional baby booties.


It's perfect. It's simple. It's quick, which is particularly important when you get the informal, "By the way, we're gonna have a baby shower for so-and-so this Saturday. Can you come?" (Usually comes on a Thursday.)


The pattern is based loosely on a pair of woolen baby booties my aunt brought home from Ireland for my infant daughter. The pattern is tradition and unusual in these modern times, which makes it stand out at baby showers. Paired with a pattern I was already using I was able to make it my own. The upper portion is knit in one piece, then stitched down the back. The sole is a piece of fleece, leather on one side with fluffy wool on the other, which makes them non-skid and still super cozy on baby's feet! A ribbon through the eyelet row helps keep them on little kicky feet.


And, the most important part, I make them with Sweet Grass Yarn, the wool grown locally and processed in a way that allows the natural lanolin to remain in the yarn. And of course I package them in a custom, hand-painted box featuring (what else?) fluffy sheep.


It's a very personal gift that I am quite proud of. Hopefully I will continue to be able to use local wool and support my local sheep ranchers!